
Case Scenario
You are constantly receiving data from a client. You have agreed that the data should always be sent using a defined structure. Unfortunately, sometimes the data received is incorrect and thus the job generates rejects. If your job does not capture the rejects and the input component does not have the “die on error” tick-box set, then chances are you are ending up with incorrect job results at the end, as part of the data is not processed due to an incorrect structure. For example: A column has a String data type instead of the expected Integer data type. The “input” component will skip this data.
Fortunately, you can easily set up a “reject” row from your “input” component. However, if you wish to take it a step further. For instance to capture rejects in a “black boxed” job, then read on!
Setting-Up an Example Job
Follow the steps below to set-up a job that will be used to illustrate the example.
- Create an Excel file (.xls format);
- Add the following data:
| ID | Name | Lname | BadData |
| 1 | RandomName1 | RandomLname1 | sdf |
| 2 | RandomName2 | RandomLname2 | sdf |
| 3 | RandomName3 | RandomLname3 | |
| 4 | RandomName4 | RandomLname4 | |
| 5 | RandomName5 | RandomLname5 | |
| 6 | RandomName6 | RandomLname6 | sdf |
| 7 | RandomName7 | RandomLname7 | |
| 8 | RandomName8 | RandomLname8 | |
| 9 | RandomName9 | RandomLname9 | sdf |
| 10 | RandomName10 | RandomLname10 | |
| 11 | RandomName11 | RandomLname11 | sdf |
| 12 | RandomName12 | RandomLname12 | |
| 13 | RandomName13 | RandomLname13 | |
| 14 | RandomName14 | RandomLname14 | |
| 15 | RandomName15 | RandomLname15 | sdf |
| 16 | RandomName16 | RandomLname16 | |
| 17 | RandomName17 | RandomLname17 | |
| 18 | RandomName18 | RandomLname18 | |
| 19 | RandomName19 | RandomLname19 | sdf |
| 20 | RandomName20 | RandomLname20 |
- Save the File;
- Start-Up Talend Open Studio;
- Create a new Talend Job;
- Add tFileInputExcel and tFileOutputExcel. Connect them as shown below;
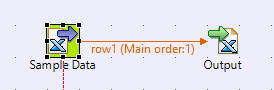 For tFileInputExcel (Sample Data): Add “File name/Street – location of the excel file you created earlier”, add the “Sheet list – the sheet name of the Excel file you created” and add a “Header – which should be 1”.
Click Edit schema button. Create a schema as shown below.
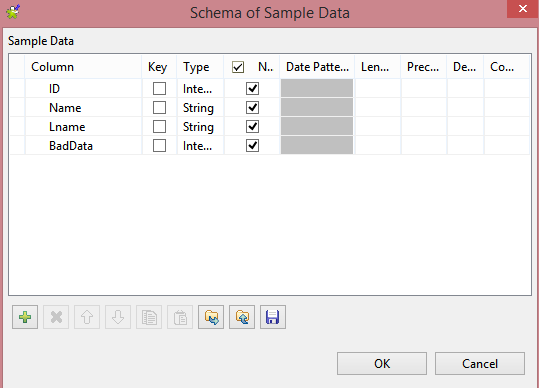
You might noticed that the BadData is of Type – Integer and not the expected String. This is done intentionally. So that the data from this column is rejected.
Connect tFileInputExcel component to tFileOutputExcel.
For tFileOutputExcel (Output): Add “File Name – any location to save the output”.
- Add tReplicate, tFilterColumns, tFileOutputExcel and tMsgBox. Connect them as shown below;
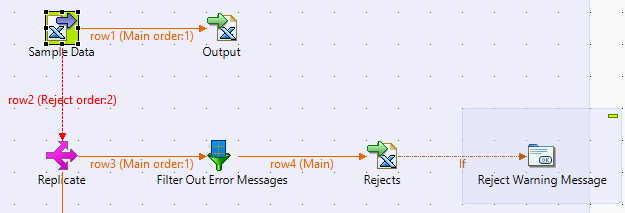 Connect Reject Row from tFileInputExcel (Sample Data) to tReplicate (Replicate).
Connect tReplicate (Replicate) to tFilterColumns (Filter Out Error Messages).
Click the “Edit schema” button and move across the first 4 Columns into the Output tab. Leave the errorCode and ErrorMessages.
Connect to tFilterColumns (Filter Out Error Messages) to tFileOutputExcel (Rejects).
Connect tFileOutputExcel (Rejects) to tMsgBox (Reject Warning Message) using an “if” trigger.
Double tap the “if” trigger arrow and add the following code:
((Integer)globalMap.get("tFileOutputExcel_2_NB_LINE")) != 0
This will make the tMsgBox component active only when the “if” trigger is equal true.
For tMsgBox (Reject Warning Message) add the following code:
"There are " + ((Integer)globalMap.get("tFileOutputExcel_2_NB_LINE")) + " rejects in the Sample Data.\nClick 'Yes' if you wish to see more details."
- Add tFilterColumns, tSampleRow, tDenormalize, tFlowToIterate and tMsgBox. Connect them as shown below;
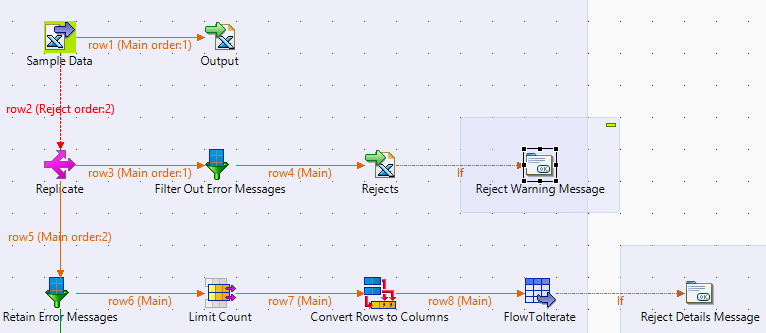 Connect tReplicate (Replicate) to tFilterColumns (Retain Error Messages).
In tFilterColumns (Retain Error Messages) click the “Edit schema” button and select the errorCode and errorMessage for the output tab. The rest of the settings are irrelevant.
Connect tFilterColumns (Retain Error Messages) to tSampleRow (Limit Count).
For tSampleRow (Limit Count) select the following “Range” – “1..5”
Connect tSampleRow (Limit Count) to tDenormalize (Convert Rows to Columns).
For tDenormalize (Convert Rows to Columns) press the “Sync columns” and add both errorCode and errorMessage Columns. As a Delimiter use “;\n”.
Connect tDenormalize (Convert Rows to Columns) to tFlowToInterate (FlowToIterate).
Connect tFlowToInterate (FlowToIterate) to the second tMsgBox (Reject Details Message) using the “if” trigger.
Double click the “if” trigger arrow and add the following code:
((String)globalMap.get("tMsgBox_1_RESULT")).equals("0")
For tMsgBox (Reject Details Message) add the following code:
"Error code(s): \n"

+ ((String)globalMap.get("row8.errorCode"))

+ ";\n"

+ (String)globalMap.get("dots")

+ "\nError message(s): \n"

+ ((String)globalMap.get("row8.errorMessage"))

+ ";\n"

+ globalMap.get("dots")
- Add a tJava component. You should end up with the structure shown below;
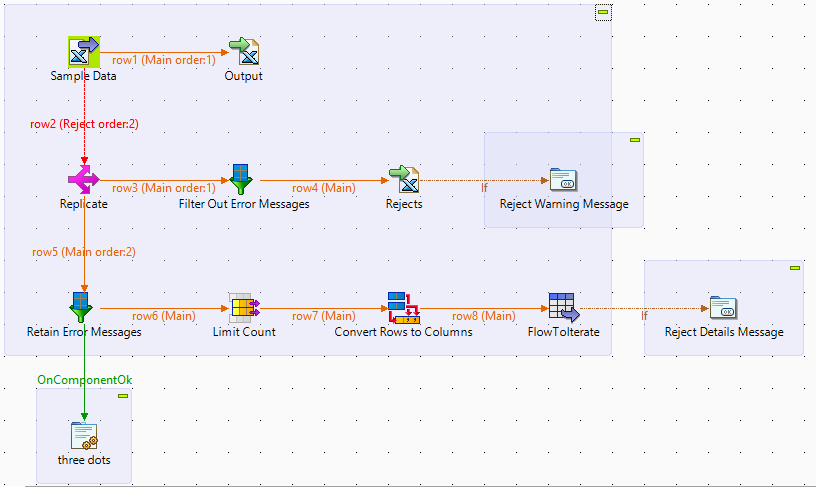 Connect tFilterColumns (Retain Error Messages) to tJava (three dots).
For tJava (three dots) add the following code:
int rejectCount = ((Integer)globalMap.get("tFileOutputExcel_2_NB_LINE"));

String dots;

if (rejectCount > 5) {dots = "...";} else {dots = "";}

globalMap.put("dots", dots);
- Run the Job;
Soon after you have started the job you will see the first Message box pop-up. It will look like this:
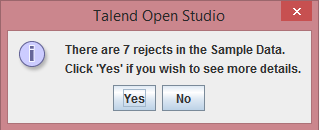
- Click the “Yes” button.
You will get a second Message box pop-up. It will look like this:
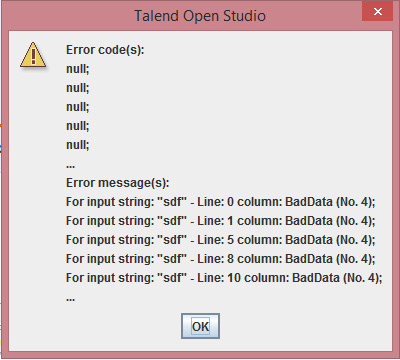 You will notice that multiple error messages have been concatenated in to a single String but are separated by a “;” and a “new line” and a “…” notifies that there are more error messages. This was made possible by several components.
The tJava component looks at the amount of rejects generated and if it exceeds the defined number a global variable – “…” is created.
The tSampleRow component limits the amount of rows that will be pasted further down.
The tDenormalize component converts rows in to a column, thus creating a single string. However, the modification to the delimiter – “;\n” creates “new lines for every errorCode and errorMessage”.
The “if” trigger for the second tMsgBox looks at the action taken in the first tMsgBox and if the “Yes” button was pressed then the second tMsgBox is activated. Which combines the errorCode with the errorMessage.
Conclusion
This example can be used when you are “black boxing” your job for a client. If there are any rejects or any other issues you can represent them to the client in an easy clean way. Instead of asking them to refer to a log file that is stored somewhere on there system.
what data gets into reject row from tFileinputExcel and how?
Hi Gaurav, I didn’t write the article, but from what I see, all of the data goes from the source when you connect tFileinputExcel to tReplicate using the ‘Reject Row’ connector.
In this case, I think Andrey used the tFilterColumns to include all of the source data columns and exclude the error code column and error message column to create the reject output Excel file and warning message.
Then he used the error code column and error message column to create the detailed error message box.
Does that make sense?